
It’s been quite some time, but we have a bunch of new Evan photos posted in the photo album. Everything in the “By Age” category from 15 months on is new.
It’s the Great Pumpkin, Charlie Brown!
Dusty’s parents came up to visit today, so we took Evan out to Tanner’s Orchard. Evan had a great time running around the playground, riding a pony, and helping us pick out a pumpkin.
They have U-pick pumpkins there, and it’s $5 for any pumpkin in the field. You take a wagon ride out into the field and head out from there. We wandered a few hundred yards and found a spot where they must dump their toxic waste. Casting all practicality aside, I focused on how much pumpkin I could get for my money.


My father-in-law and I ended up mostly rolling it back to the wagon and to the van. Upon returning home, we put it in the scale: 105lbs! I don’t know what we’re going to do with it, but this is America, and more is better!
Congratulations Nathan and Erin!
Over the weekend my younger brother got married. Everything went very well and it was a nice occasion. Congratulations Nathan and Erin!

Kickball game
Well, the weather held off yesterday and despite fairly poor turnout we had a decent game of kickball. Nathan, Laura, Brent, Dan, Beth, and Larry showed up and we played for about an hour and a half.
We started by playing a few innings with two batters and five fielders. We played with a 1-strike starting count and counted a third-strike foul as an out (which meant a significant number of foul-outs). We didn’t allow walks (you could pass on any pitch with no penalty) and did allowing “bunting”. For the most part, those rules worked pretty well, but with only five fielders the outfielders did quite a bit of ball-chasing.
Our solution was to play an infield-only game. Any ball kicked in the air onto the outfield grass was an out. Any ball bouncing or rolling into the outfield was a ground-rule double. This made the game work great, even though I personally had a problem with my batting average then! Keeping all the play in the infield made the field easier to cover with our limited fielders and resulted in more people getting pegged by the ball!
Folks at work were expressing interest in playing again, so we’re going to try to put together another game in the near future. We’re also considering playing wiffleball, flag football, and other games from our youth. Any suggestions?
Being a kid again
Last weekend, we decided to have a party at our house, since we had no other plans. It was the best time I’d had in quite some time- the weather was fantastic (which never happens for my parties) and despite extending the invitations only five days ahead of time we had 23 people show up. With turnout that high, I don’t think I’m going to bother planning ahead on parties any more!
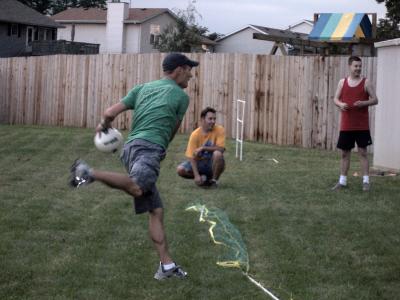
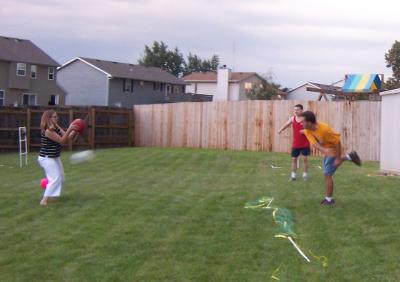
Eric and April came down for most of the weekend, but Sunday was the main party. It wasn’t for my birthday, but Dusty surprised me with a cake. We had a small cookout, played some yard games, and watched all the kids play together. Afterwards, in an attempt to recapture a piece of our own childhoods, we put together an impromptu dodgeball game, as you can see in the pictures below. I have to apologize to Laura for the second picture! At least it seems I aimed below the waist…
After most folks left, Eric, Dave and I went down to the basement to record an audio commentary track for a DVD of some of our college experiences. We got Brad on the line via Skype and told some of our old stories to get them recorded for posterity. It turned out pretty entertaining, so we’ll have to show it next time the college guys get back together!
Tomorrow, if the weather cooperates, I’ve scheduled a time with friends and coworkers for reliving one of my favorite childhood activities: kickball!
Knot Knowledge
Last year a friend was getting ready to move cross-country and asked for my help. Having loaded my share of U-haul trucks, I knew that securing a load for a long journey would be tricky. You typically can’t effectively use ratchet straps or bungee cords in a U-haul truck because of the way the rails on the walls are designed. The best solution, and something I’d been meaning to learn anyway, was to learn how to tie a proper knot. I did a lot of reading and through my studies came up with a list of five knots that anyone who ever touches a piece of rope should know.
- Bowline: If you’re going to learn how to tie one knot, make it a bowline. A bowline is an easy way to make a loop in the end of the rope. Unlike the loops most of us tie, this one will not tighten up on whatever you’re tying it around. I’ve used it for tying a rope to a sled, securing a load in a truck, etc.
- Taut-line hitch: It’s a nice adjustable knot that you can use to change the tension of a line. For me, it’s most useful for tent poles, running a line from the top of the pole to a stake in the ground. You can slide the knot up and down the line to add or reduce the tension without moving the stake or re-tying the knot.
- Trucker’s hitch: If you have to tie something down, like cargo in a truck, this is the knot to use. It works like a pulley system, multiplying the force of your pull. A similar knot is the Versatackle, which simulates a block and tackle.
- Butterfly loop: Also called a lineman’s loop, it’s a quick way to tie a loop in the middle of a rope.
- Sheet bend: If you need to tie two ropes together to make a longer line, give this knot a try – you’ll find it won’t come apart like what you’re probably used to tying.
Here are some more knot-related links in case you want to learn more:
Here are a couple more fun knots:
- Sheepshank: Falls apart as soon as you quit pulling on it!
- Hangman’s noose: Works great for tying up ratchet straps!
- Monkey’s fist: Great for throwing!
Even more internet frivolity
Here are a few more interesting things I’ve stumbled across:
- Ever wonder what the “voiceover guy” looks like?
- Serial Killer or Programmer?
More funny videos
I spent hours watching stupid videos on the internet so that you don’t have to! Here are a few that I enjoyed:
- George Bush singing “Sunday Bloody Sunday”
- Hyakugojyuuichi! – an “Animutation”
- Road Van Trip Prank
- Talking Cats
- Tea Partay – music video
- Treadmill Bike
- Why Sumo is better than Karate
- Biker runs into a ditch
(strong language, but listen to the guy afraid of a beating!)
Evan update
It’s been quite a while since we posted about Evan, so here’s how he’s doing. Since he’s learning things so fast, this is probably one of the last times he’ll have a small enough number of skills that I can come close to listing them all.
Evan knows the following signs, a few of which he made up on his own: fish/water, light, nurse, tree, butt (he made that one up!), ceiling fan, pick me up
Here are the words he uses (and means): hi, mom, dad, duck, dog, kitty cat, good girl, uh oh, on, off, this, that, light, quack, bow wow, again, three, Gram, car, cup, go
He’s picked up the following tricks:
- Turning a lightswitch on and off when you ask him to
- Opening doors
- Singing along to the Wiggle’s song “Bow Wow” (he just sings Bow Wow over and over!)
- Knowing when “Bow Wow” is coming up in the video
- Recognizing the Bow Wow song just from the rhythm section. The Wiggles sometimes use the backing track to teach a new dance
- Dancing to the Wiggle’s “Teddy Bear Song”
- Dancing and singing to the Wiggle’s “Quack Quack” song
- Running and spinning in circles
- Using the hokey to pick up his spilled cereal
- Making a siren sound when he plays with his firetruck
- Drinking from his cup and taking it to the fridge for a refill
- Reading his book about cats and pointing out the “good girl” on every page and the fish at the end
- Pretending to eat and drink play food
- Riding his rocking horse while pointing out all the “good girls” on the calendar
- Pretending to talk on the phone, and on anything else that remotely looks like a phone
- Kicking himself in the head when you say “Boot to the head!”
- Saying “Three!” when he wants water dumped on his head in the bathtub
- Grabbing your hand and asking you to continue tickling him
- Giving hugs when requested
- Sitting on people’s laps when they’re sitting on the floor
- Petting Ginger very gently and calling her “good girl”
- Building towers with his wooden blocks and assembling his legos
- Sorting things into boxes or taking them out
- Sharing his water bottle with you, and insisting you take a drink
- Tipping his head toward you to ask you to put a hat on his head
- Climbing up and down the stairs using many different and terrifying techniques
- Slide down a slide by himself (face first of course…)
- Running to the stairs when you say it’s time to go somewhere
- Sticking his finger in his mouth and blowing when you show him how to “Shh!”
- Helping put on his shoes
- Doing the “Mokey Dance” (similar to the “pee pee dance”) when he’s impatient or excited
- Whispering “whap!” when anyone tosses a ball
We’ve been trying to capture his new “tricks” on video, but he gets a little camera shy!
Standalone DVD recorder reviews
For the past couple of weeks I’ve been researching and experimenting with standalone DVD recorders- the ones that work like a VCR, not the drives that work with your computer. I’ve long had a project to convert all my old home videos to DVD format, but my progress has been very slow, since using a computer to capture, edit, encode and burn takes a long time. For many of my tapes, that process is required, since there’s a fair amount of editing I want to do. However, for most of the tapes, the simple editing features provided by standalone DVD recorders will suffice. The trick has been to find the right one. In this post I’ll share with you what I’ve learned.
Since I’m sure not everyone has the same expectations that I have, and there are a lot of features that I don’t really care about, so here are the criteria I used in choosing a suitable recorder:
- Must create compatible discs that can be played on most DVD players
- Must have a firewire/DV input to allow a connection to a digital camcorder
- Must allow you to create chapter points in the titles you record (allowing the viewer to skip to the different scenes in your video)
- Must allow you to erase or hide a section in the middle of a title
- Must be able to split a title into two separate titles (so you can hit record, capture the whole tape, and split it up later)
First of all, one thing you should understand is the difference in recordable DVD formats. For most purposes, DVD-R (minus) and DVD+R (plus) are basically equivalent. Unfortunately, that’s not the case when it comes to real-time DVD video recording. In order to use some of the nice editing features, such as manual chapter creation, splitting titles, etc. you have to use a recording format called “VR” (video recorder) mode. Both plus and minus formats have a VR mode, but the big difference is that DVD+VR is compatible with the DVD-Video spec, and DVD-VR is not. Therefore, DVD+VR will play in most DVD players, but DVD-VR discs will only play on certain players. I’ve left out a lot of detail, but the point is, in order to do what I want, plus format is the way to go. Here are some articles in case you’re interested:
- http://www.dvdplusrw.org/Article.asp?mid=0&sid=3&aid=11
- http://www.dvdplusrw.org/Article.asp?mid=8&sid=11&aid=15
- http://www.ulead.com/learning/general/video_04_1.htm
- http://www.burnworld.com/dvd/primer/dvdvr.htm
Ok, on to the trials. I purchased a bunch of DVD recorders, and most of them went back to the store. I feel a little bit of remorse about taking advantage of the stores’ return policies, but then again, you’ll see that many of the units fell short of my expectations. The only way to know how they worked was to read the manual and try them out.
Here are the units I tried:
- Sony GXR315
- Panasonic DM-ES20
- Philips DVDR 3390
- Panasonic DM-ES15S
- LG DR1F9H
- Philips DVDR 3400
The first batch I purchased was the Sony GXR315 and the Panasonic DM-ES20. Both were open-box buys, just for full disclosure. In fairness, there’s a chance that they were in fact defective. First of all, the Sony. It seemed like a nice unit in the manual, but there’s no point in even discussing the features. The video I recorded played back very poorly on other players. There were glitches in the video and spots where it appeared the recording paused. In another trial, the disc created couldn’t even be recognized by my other players. The Panasonic didn’t fair any better. First of all, it came in a box purporting to be a Panasonic DM-ES15S (a newer model), but that’s the store’s fault, not the player. When I hooked it up, the picture was messed up. I could tell that it was in PAL mode (a different TV format used in other parts of the world), but reading through the manual gave no indication how to change it to NTSC. Those recorders both went back… not a very comforting start.
Next I picked up a REAL Panasonic DM-ES15S. It would record on both plus and minus formats as well as DVD-RAM. It made nice looking menus for the discs and had a nice method of entering text using the remote control. Best of all, it had a “flexible recording” mode. Most of the recorders I tried had fixed recording modes, similar to the recording modes on VCR’s (SP, LP, SLP, etc). These modes allow you to choose how much video will fit on a disc. If you fit just 1 hour of video on a disc, it will be very good quality, but if you cram 6 hours onto a disc, the quality suffers. Most recorders provide 1 hour, 2 hour, 4 hour and 6 hour modes, but not this Panasonic. If you have a 2 hour 10 minute video you want to record, you can fill the disc with exactly that time. On other fixed-mode recorders you might need to use the 4 hour mode to fit that length of video, leaving much of the disc unused. Now the downside – all the editing features, such as splitting titles, creating chapters, etc. are only available if you use DVD-RAM or DVD-VR, both of which aren’t playable in regular DVD players. Unfortunately, for me, that’s a deal-breaker, so it went back to the store.
Next up was the Philips 3390. It was one of the cheaper recorders available ($144) but I was actually pretty happy with it. It allows you to create chapters manually while playing back your recorded video and also lets you split up a recording/title into two titles (at least when using DVD+RW’s, which is what you really need to use for this work anyway). You can also cut sections out of the video you recorded by creating chapters and hiding them. The interface isn’t the prettiest, but the recorder worked reliably and predictably. Entering text (to name your titles, etc.) is a slow process, but that’s no big deal. The biggest downside to this player is the lack of a flexible recording mode. Many things I’d like to put on a disc might be 2 hours and 10 minutes. Your only choice is to use the 4 hour mode, which isn’t good enough quality to me and leaves nearly half of the disc unused. The remote control was pretty small and didn’t have dedicated buttons for skip and fast forward (they were the same button, which made scanning to create chapter points a little difficult). Overall, though, this recorder did what I wanted and would have been acceptable, but I took it back.
The next contender was the LG DR1F9H, a sleek looking player, though why they put the buttons on TOP of the unit instead of on the front where you can use them is beyond me. I guess you’re supposed to let this unit stick out a little further than the other A/V components so those buttons are accessible. No big deal, there’s a nice remote anyway.
This recorder has the required functions when using DVD+RW discs: splitting a title, manually creating chapter points, and removing a part out of a title. The menus on this unit look very professional, and the menus created on the discs get the job done nicely. The text entry screen is better than both Philips recorders, and the remote has dedicated buttons for adding chapter points and setting an index image. One nice feature is the ability to set chapter points while RECORDING, not just during playback. This is the only unit I’ve seen with that ability. This is a very nice unit, and even though it costs $230 ($80 more than its competitors) it is worth owning. Unfortunately, this recorder has a down side as well, the lack of flexible recording modes, or at least more choices in modes… Once again, a 2 hour 10 minute tape will need to be recorded in 4 hour mode. If I can convince myself that this feature isn’t important, or if LG releases new firmware to enable more recording modes, I will likely keep this recorder, as its other features are very nice.
The final contender is the Philips 3400, which is a close relative to the 3390. I got it on sale for $150. They both share the same case design and much of the same software, but the remote control is more functional and there are a few subtle differences that really make a difference. The 3400 has the ability to manually add chapters, hide chapters, and split titles just like the 3390. The 3400’s remote control has dedicated buttons for skip and fast forward and is just laid out better than the 3390. Also, the 3400 allows you to add chapter points while playing back the title at any time by using a menu option, while on the 3390 you had to enter “edit mode” first, which sent you back to the beginning of the title. As a result, creating chapter points on this unit is nicer than on the 3390, but it’s still not as easy as on the LG unit (with its a dedicated button). This unit’s salvation comes in the form of its many recording modes. In addition to the 1, 2, 4 and 6 hours modes on most units, the Philips 3400 adds the intermediate modes of 2.5 hours and 3 hours. This is close enough to “flexible recording” that I’m happy with it.
Right now, both the LG and the Philips 3400 are set up on my desk, but I haven’t decided for sure which one to keep just yet. It will most likely be the Philips, but I’ve decided to do a couple of full-disc trials to make sure it works in real life situations. So far, it’s worked great. I’ll do some more experimenting with the LG as well.
One thing I learned in this experiment is that DVD recorders, though they’ve come a long way since I last tried them, aren’t for everyone. I imagine many people would be confused by the difference between plus and minus discs, and between rewritable and write-once discs, since recorders behave differently depending on what type of disc is used. Additionally, the fact that not all DVD recorders create “compatible” discs that can be played in any DVD player makes me doubt their mass-market appeal. That being said, there are units out there that can do what I want them to do, and having tried most of them, I’m ready to get to work!